Building a Three-Node Red Hat Ceph Storage Lab on KVM: From VM Cloning to a Working RBD Pool
Recently, I was working with a European telecom carrier as a cloud consultant, performing a technical assessment of platforms such as Red Hat OpenShift, OpenStack, Kubernetes, and VMware. Naturally, storage was an integral part of the assessment across all these platforms. Since it had been quite some time since I had worked hands-on with Ceph, I decided this was a good opportunity to refresh my knowledge and explore the latest Red Hat Ceph Storage implementation in my lab. As part of this exercise, I built a complete three-node Ceph cluster on KVM. I started with a single Red Hat Enterprise Linux (RHEL) master VM, cloned it into three independent virtual machines, attached three dedicated storage disks to each VM, prepared the operating systems, bootstrapped the Ceph cluster using cephadm, added the remaining hosts, deployed nine OSDs, verified MON quorum and cluster health, and finally created and tested an RBD pool.
The objective was not merely to get CEPH running. I wanted to understand the sequence of operations and what CEPH was doing at each stage. For that reason, this article includes the commands, representative outputs, architecture, terminology and the monitoring issue I encountered during deployment.
Lab note: The VM cloning shell script I used for this lab is available in my GitHub repositories under https://github.com/ranjeetbadhe/ceph.git. The script automates creation of the cloned KVM guests and their virtual disks. Repository contents may evolve, so locate the current CEPH/KVM cloning script there. You can complete the installation in 90 minutes !!!!!
In CEPH, we typically do not configure RAID on the individual storage servers; instead, we present the individual disks directly to CEPH as OSDs—essentially a JBOD (Just a Bunch Of Disks) model.
Later, we will see how CRUSH provides RAID-like data placement and redundancy at the distributed cluster level, rather than relying on a traditional hardware RAID controller.
Table of Contents
- Lab Architecture
- Important Ceph Terms
- Creating the Three VMs
- Adding Three OSD Disks per VM
- Validating the Cloned Machines
- Networking and Name Resolution
- Repository and Registry Preparation
- Checking cephadm and Podman
- Bootstrapping the Ceph Cluster
- Understanding What Bootstrap Created
- Adding ceph002 and ceph003
- Discovering Available Storage Devices
- Deploying Nine OSDs
- Validating Cluster Health and CRUSH Placement
- Creating an RBD Pool
- Creating a Test RBD Volume
- Monitoring Stack and node-exporter Issue
- Final Architecture and Lessons Learned
1. Lab Architecture
| Node | IP Address | OS Disk | Ceph OSD Disks | RAM |
|---|---|---|---|---|
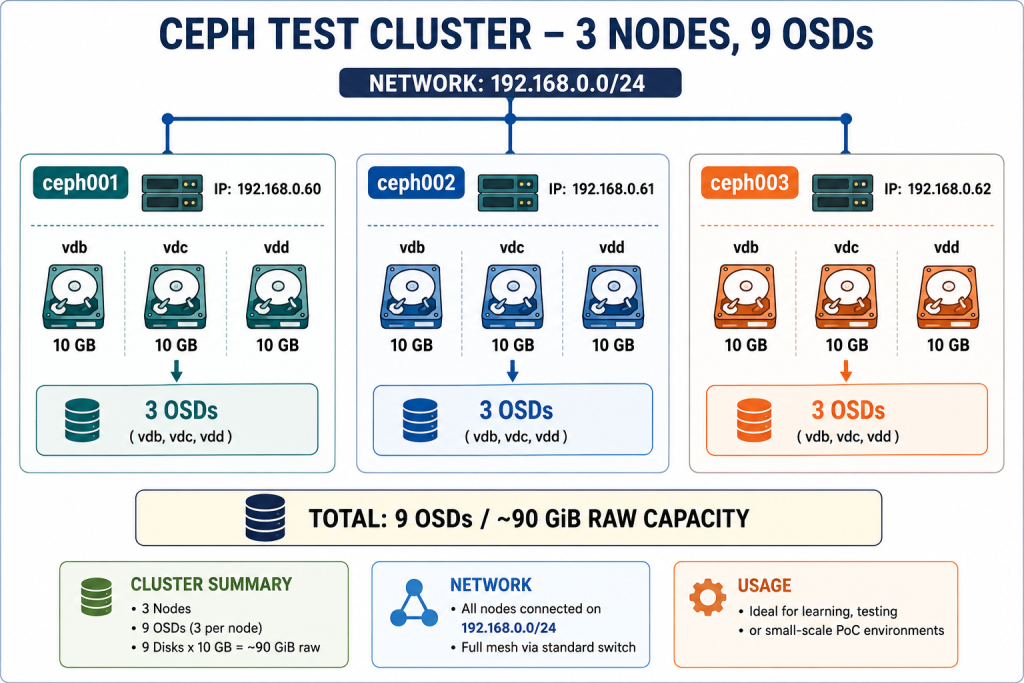
| ceph001 | 192.168.0.60/24 | vda – 50 GB | vdb/vdc/vdd – 10 GB each | 12 GB configured |
| ceph002 | 192.168.0.61/24 | vda – 50 GB | vdb/vdc/vdd – 10 GB each | 12 GB configured |
| ceph003 | 192.168.0.62/24 | vda – 50 GB | vdb/vdc/vdd – 10 GB each | 12 GB configured |
My Ceph lab runs as a three-node virtual cluster on a RHEL 9 KVM/libvirt host. I created a fully prepared master VM and used an automated shell script to clone it into ceph001, ceph002, and ceph003, giving each node its own identity and network configuration. Each Ceph VM was then provisioned with three dedicated 10-GB virtual disks (vdb, vdc, and vdd) for OSD deployment. This provided a compact but realistic Ceph environment with 3 nodes, 9 OSDs, and approximately 90 GiB of raw storage capacity.
2. Important Ceph Terms in One Line Each
| Term | Simple meaning |
|---|---|
| MON / Monitor | Maintains authoritative cluster maps and quorum so every Ceph component agrees on cluster state. |
| MON map | The map identifying the monitors that belong to the Ceph cluster. |
| MGR / Manager | Provides management, statistics, dashboard and orchestration functionality. |
| OSD | Object Storage Daemon responsible for storing data on a Ceph storage device and participating in replication/recovery. |
| OSD map | The cluster’s current view of OSDs, including which are up/down and in/out. |
| PG | Placement Group: a logical grouping used to distribute objects efficiently across OSDs. |
| PG map | The current placement/state information for placement groups, such as active+clean. |
| CRUSH | Controlled Replication Under Scalable Hashing: Ceph’s algorithm for deterministically deciding where data replicas should be placed. |
| CRUSH map | Describes the storage hierarchy and failure domains—such as root, host and OSD—that CRUSH uses for placement. |
| Pool | A logical storage container in Ceph with properties such as replication size and PG count. |
| RBD | RADOS Block Device: Ceph block storage presented as virtual block images to clients. |
| RADOS | The underlying distributed object-storage layer of Ceph. |
| Quorum | The majority agreement among monitors required for the cluster to maintain a consistent state. |
| cephadm | Ceph deployment/orchestration utility that manages containerized Ceph daemons. |
| ceph orch | The orchestration interface used to add hosts and deploy/manage Ceph services. |
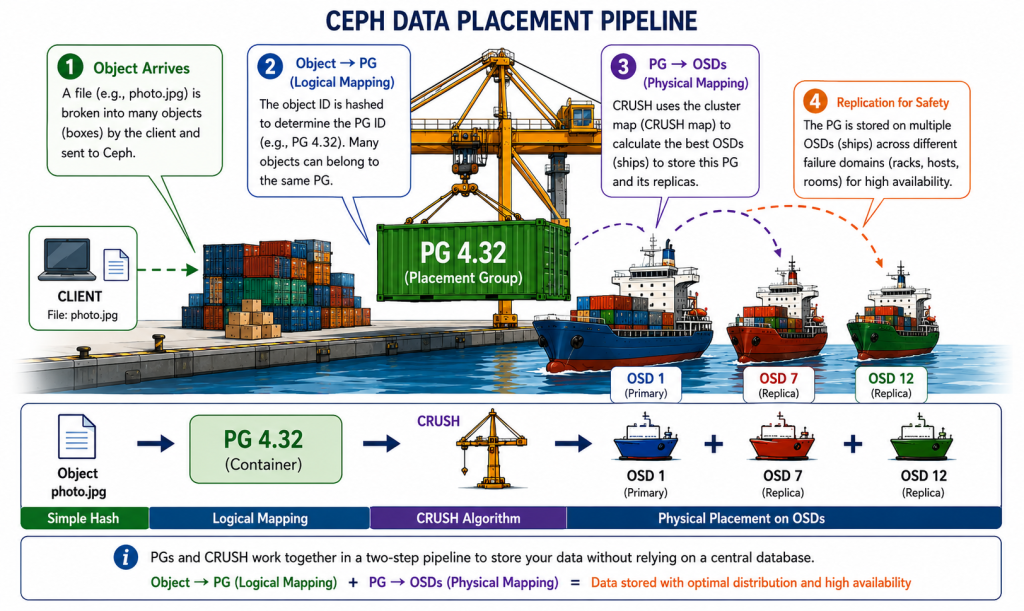
To understand CEPH better, let us take a simple example and think of CEPH as a large automated shipping port. Imagine that our data objects are individual cargo boxes arriving at the port. Instead of managing millions of boxes individually, CEPH logically groups these objects into Placement Groups, or PGs, just like a shipping port groups many boxes into manageable shipping containers. Once an object is mapped to a PG, the CRUSH algorithm acts like an intelligent crane operator. It looks at the CRUSH map, which is essentially the blueprint of our port showing the available OSDs, hosts, racks, and failure domains, and calculates where the PG should be stored. The selected OSDs can be thought of as storage ships, with one acting as the primary and the others maintaining replica copies for protection. For example, our photo.jpg object might be mapped to PG 4.32, and CRUSH might determine that its data should reside on OSD 1, OSD 7, and OSD 12. In this way, CEPH can efficiently distribute, replicate, and recover data across the cluster without depending on a central database to track the physical location of every individual object.
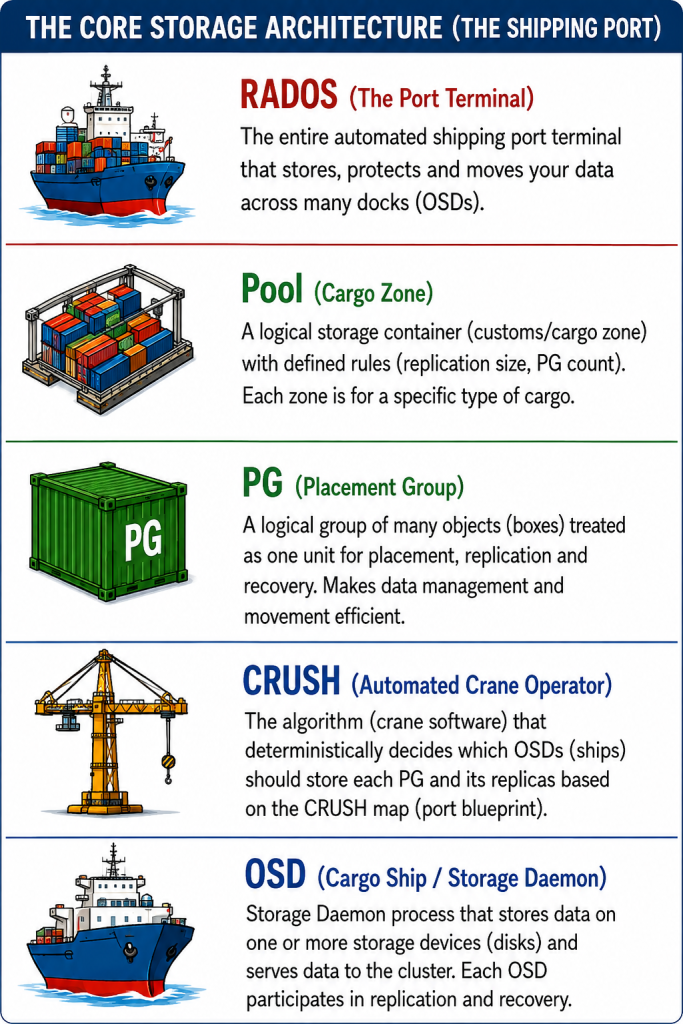
To understand the core storage architecture of Ceph, I like to continue with our shipping-port example. Think of RADOS as the entire port terminal, the underlying infrastructure responsible for storing, protecting, and moving our data across the cluster. Within this port, we have Pools, which are like dedicated cargo zones where different types of cargo can be organized according to specific rules such as replication and placement settings. Inside these pools, our data objects are logically grouped into Placement Groups, or PGs, which we can think of as shipping containers that allow many individual boxes to be managed efficiently as a group. Now we need to decide where these containers should go, and this is where CRUSH comes into the picture. CRUSH acts like an intelligent automated crane operator: it uses the CRUSH map, which is like the blueprint of our port, to calculate which OSDs should hold each PG and its replicas while respecting failure domains. Finally, we have the OSDs, which we can visualize as the storage ships in our example. The OSD daemons manage the actual storage devices where the data is stored and actively participate in replication, recovery, and rebalancing. So, in simple terms, RADOS is our port, Pools are the cargo zones, PGs are the shipping containers, CRUSH is the intelligent crane operator, and OSDs are the storage ships that ultimately hold and protect our data.
contents
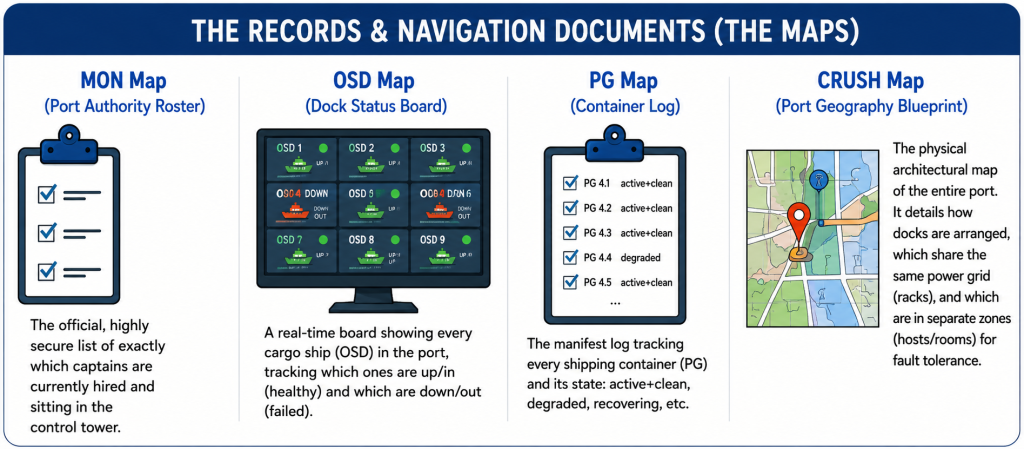
Now that we understand how RADOS, Pools, PGs, CRUSH, and OSDs work together, let me continue with our shipping-port example and look at something equally important: the maps that keep the entire Ceph cluster coordinated. Think of the MON Map as the official Port Authority roster, telling us which monitors are responsible for maintaining the authoritative view of the cluster. The OSD Map is like the port’s live dock-status board, showing which OSDs are available and whether they are up/down and in/out of the cluster. The PG Map can be compared to our container-status information, helping us understand the current state of Placement Groups—for example, whether they are active+clean, degraded, or recovering. Finally, the CRUSH Map is like the physical blueprint of our entire port: it describes how storage is organized into OSDs, hosts, racks, and other failure domains. CRUSH uses this topology when deciding where replicas should be placed. What I find particularly useful about this analogy is that these maps have different responsibilities but collectively give Ceph the information it needs to understand who is managing the cluster, which storage resources are available, what state our data is in, and how the physical storage infrastructure is organized.
.
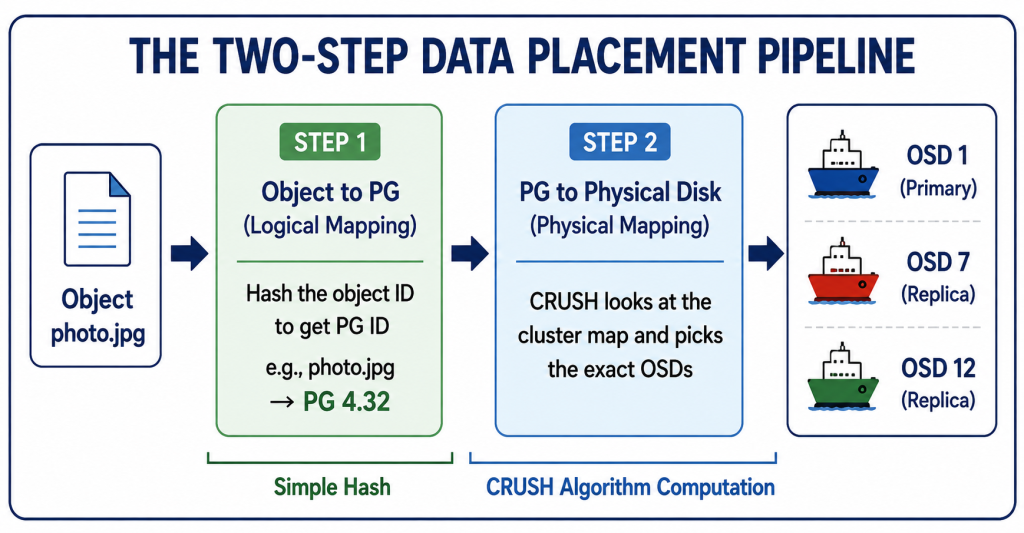
Now that we have understood the major components and maps, let me connect everything together and see how CEPH actually decides where our data will be stored. I find it easiest to think of this as a simple two-step process. Suppose we want to store an object called photo.jpg. In the first step, CEPH uses a hash-based calculation to logically map that object to a Placement Group (PG)—for example, PG 4.32. Going back to our shipping-port analogy, this is like assigning our cargo box to a particular shipping container. In the second step, CRUSH takes that PG and, using the current cluster topology and CRUSH rules, calculates the OSDs responsible for storing it. If our pool is configured with three replicas, the resulting acting set might contain OSD 1 as the primary, with OSD 7 and OSD 12 as the other replica OSDs. What makes this architecture particularly interesting to me is that CEPH does not need a central database containing the physical location of every individual object. Instead, the placement can be calculated from the object, pool configuration, cluster maps, and CRUSH rules. So, continuing with our port analogy: the cargo box is assigned to a container, and the intelligent crane uses the port blueprint to determine the appropriate storage ships for that container and its replicas. This two-stage mapping—Object → PG → OSDs—is one of the fundamental ideas behind CEPS’s ability to scale while keeping data distributed and resilient.
3. Creating Three VMs by Cloning a Master VM
I began with a prepared KVM guest named mastervm. Its primary QCOW2 image was located at /var/lib/libvirt/images/mastervm.qcow2. Rather than installing RHEL independently three times, I cloned the master into ceph001, ceph002 and ceph003.
Before cloning, I shut down the source VM. A disk image should not be blindly copied while the source guest is actively modifying it.
virsh shutdown mastervm
virsh list --all
The cloning workflow creates independent QCOW2 disks and libvirt domain definitions. I then made sure each guest had its own hostname, IP address and machine identity. This matters because cloned Linux systems must not continue operating as identical machines.
The resulting guests were:
virsh list --all | grep ceph00

 2    ceph001             running
 3    ceph002             running
 4    ceph003             running
4. Adding Three Storage Disks to Every Ceph VM
The operating-system disk was vda. I added three additional 10 GB virtual disks to each guest. These disks were intentionally left unformatted because Ceph would consume them as OSD devices.
vda = 50 GB  - RHEL operating system
vdb = 10 GB  - Ceph OSD
vdc = 10 GB  - Ceph OSD
vdd = 10 GB  - Ceph OSD
For three nodes, this gave me nine OSD devices and approximately 90 GiB of raw Ceph capacity.
5. Validating Every Node Before Installing Ceph
I did not proceed directly to bootstrap. First I validated hostname, IP addressing, disks, memory and operating-system version on every node.
hostnamectl
ip -br addr
lsblk -o NAME,SIZE,TYPE,FSTYPE,MOUNTPOINTS
free -h
cat /etc/redhat-release
On ceph001 the important results were:
Static hostname: ceph001
Operating System: Red Hat Enterprise Linux 9.8 (Plow)
Virtualization: kvm

enp1s0           UP             192.168.0.60/24

vda              50G disk
vdb              10G disk
vdc              10G disk
vdd              10G disk
The same validation showed 192.168.0.61 on ceph002 and 192.168.0.62 on ceph003.
Because the VMs originated from a common master image, I also checked hostnamectl and confirmed that the machine IDs were different on all three guests.
6. Verifying the OSD Disks Were Clean
This was an important checkpoint. The three Ceph disks needed to be unused. I verified them using:
lsblk
lsblk -f
The result showed no filesystem, LVM membership or mount point on vdb, vdc or vdd.
vdb           252:16   0   10G  0 disk
vdc           252:32   0   10G  0 disk
vdd           252:48   0   10G  0 disk
I deliberately did not create XFS filesystems or mount these disks. Ceph’s OSD provisioning process needs the raw available devices.
7. Testing Network Connectivity and Time Synchronization
From ceph001 I verified connectivity to the other Ceph hosts.
ping -c 3 ceph002
ping -c 3 ceph003
Both nodes responded with zero packet loss. I then tested SSH:
ssh root@ceph002 hostname
ssh root@ceph003 hostname
The responses were:
ceph002
ceph003
I also checked gateway and Internet connectivity and validated NTP synchronization:
ping -c 2 192.168.0.1
ping -c 2 8.8.8.8

timedatectl
chronyc tracking
The clock was synchronized and chronyd was active. This is important in a distributed system because significant time discrepancies can complicate monitoring, logging and cluster operations.
8. Preparing Red Hat Repositories and Container Registry Access
The hosts were registered with Red Hat Subscription Management using Simple Content Access. The enabled repositories included BaseOS, AppStream and the Red Hat Ceph Storage 5 tools repository.
subscription-manager identity
subscription-manager status
dnf repolist
The enabled repositories were:
rhceph-5-tools-for-rhel-9-x86_64-rpms
rhel-9-for-x86_64-appstream-rpms
rhel-9-for-x86_64-baseos-rpms
I also verified HTTPS access to the Red Hat registry:
curl -I https://registry.redhat.ioThe HTTP 404 response from the registry root was not a connectivity failure; the successful HTTPS exchange showed that DNS/TLS connectivity to the registry endpoint worked.
9. Verifying Podman, cephadm and Registry Login
Ceph Storage 5 in this lab used Ceph Pacific 16.2.10 and containerized daemons managed by cephadm.
cephadm version
podman --version
Output:
ceph version 16.2.10-275.el8cp (...) pacific (stable)
podman version 5.8.2
Before bootstrap I authenticated Podman against the Red Hat container registry:
podman login registry.redhat.ioAfter entering the registry credentials:
Login Succeeded!I confirmed the active registry login with:
podman login --get-login registry.redhat.io10. Bootstrapping Ceph on ceph001
I selected ceph001 (192.168.0.60) as the bootstrap/admin node. I wanted the monitoring stack as part of the deployment, so I did not use --skip-monitoring-stack.
cephadm bootstrap \
  --mon-ip 192.168.0.60 \
  --initial-dashboard-password='CephLab@123'
The bootstrap operation performed the initial cluster construction: it generated an FSID and keys, created the first MON and MGR, configured the public network, enabled cephadm orchestration, generated an SSH key, deployed monitoring services and enabled the dashboard.
Important output included:
Cluster fsid: d8155edc-9fcb-11f1-b12b-525400d0e2f5
Mon IP `192.168.0.60` is in CIDR network `192.168.0.0/24`
Creating mon...
Creating mgr...
Enabling cephadm module...
Setting orchestrator backend to cephadm...
Generating ssh key...
Adding host ceph001...
Deploying prometheus service with default placement...
Deploying grafana service with default placement...
Deploying node-exporter service with default placement...
Deploying alertmanager service with default placement...
Enabling the dashboard module...

Ceph Dashboard is now available at:
URL: https://ceph001:8443/
User: admin

Bootstrap complete.
The bootstrap also wrote:
/etc/ceph/ceph.conf
/etc/ceph/ceph.client.admin.keyring
/etc/ceph/ceph.pub
11. Why I Used cephadm shell
On the host shell, the ceph CLI itself was not directly available in my normal path. For example:
ceph orch apply osd --all-available-devices

-bash: ceph: command not found
That did not mean Ceph was missing. The correct approach for this containerized installation was:
cephadm shell -- ceph -sor to enter an interactive Ceph shell:
cephadm shellOnce inside, I could run normal Ceph commands such as ceph -s, ceph osd tree and rbd.
12. Adding ceph002 and ceph003 to the Cluster
The bootstrap initially knew only about ceph001:
cephadm shell -- ceph orch host ls

HOST     ADDR          LABELS  STATUS
ceph001  192.168.0.60  _admin
1 hosts in cluster
cephadm had generated an orchestration SSH public key at:
/etc/ceph/ceph.pubAfter preparing SSH access on the target hosts, I added ceph002 and ceph003:
cephadm shell -- ceph orch host add ceph002 192.168.0.61
cephadm shell -- ceph orch host add ceph003 192.168.0.62
The orchestrator confirmed both additions:
Added host 'ceph002' with addr '192.168.0.61'
Added host 'ceph003' with addr '192.168.0.62'
I then checked the host inventory:
cephadm shell -- ceph orch host ls

HOST     ADDR          LABELS  STATUS
ceph001  192.168.0.60  _admin
ceph002  192.168.0.61
ceph003  192.168.0.62
3 hosts in cluster
13. Discovering the Nine OSD Devices
Before deploying OSDs I asked the orchestrator to show every storage device it considered available.
cephadm shell -- ceph orch device ls --wideThe important result was:
HOST     PATH      TYPE  SIZE   AVAILABLE
ceph001  /dev/vdb  hdd   10.7G  Yes
ceph001  /dev/vdc  hdd   10.7G  Yes
ceph001  /dev/vdd  hdd   10.7G  Yes
ceph002  /dev/vdb  hdd   10.7G  Yes
ceph002  /dev/vdc  hdd   10.7G  Yes
ceph002  /dev/vdd  hdd   10.7G  Yes
ceph003  /dev/vdb  hdd   10.7G  Yes
ceph003  /dev/vdc  hdd   10.7G  Yes
ceph003  /dev/vdd  hdd   10.7G  Yes
This was the point at which I knew Ceph could see all nine intended disks and considered all of them suitable for OSD deployment.
14. Deploying OSDs on All Available Devices
I instructed cephadm to consume all available devices:
cephadm shell -- ceph orch apply osd --all-available-devicesOutput:
Scheduled osd.all-available-devices update...After allowing the orchestrator time to deploy the daemons, I checked cluster status:
cephadm shell -- ceph -sThe key result was:
services:
  mon: 3 daemons, quorum ceph001,ceph002,ceph003
  mgr: ceph001.bufxpt(active), standbys: ceph002.olzcht
  osd: 9 osds: 9 up, 9 in

data:
  usage: 46 MiB used, 90 GiB / 90 GiB avail
  pgs:   1 active+clean
9 up meant all nine OSD daemons were running. 9 in meant all nine were participating in data placement.
15. Checking the CRUSH Hierarchy
I then checked how Ceph had organized the OSDs beneath the three host failure domains.
cephadm shell -- ceph osd treeID CLASS WEIGHT TYPE NAME STATUS REWEIGHT
-1 0.08817 root default
-3 0.02939 host ceph001
1 hdd 0.00980 osd.1 up 1.00000
4 hdd 0.00980 osd.4 up 1.00000
8 hdd 0.00980 osd.8 up 1.00000
-7 0.02939 host ceph002
0 hdd 0.00980 osd.0 up 1.00000
3 hdd 0.00980 osd.3 up 1.00000
7 hdd 0.00980 osd.7 up 1.00000
-5 0.02939 host ceph003
2 hdd 0.00980 osd.2 up 1.00000
5 hdd 0.00980 osd.5 up 1.00000
6 hdd 0.00980 osd.6 up 1.00000This was exactly the topology I wanted: three OSDs under each host. With the normal replicated pool size of three and host-level CRUSH failure domains, Ceph can place replicas across different hosts rather than treating all nine disks as one undifferentiated set.
16. Understanding the HEALTH_WARN
At this stage the storage path itself was healthy, but ceph -s reported:
health: HEALTH_WARN
        3 failed cephadm daemon(s)
I checked the detailed health condition:
cephadm shell -- ceph health detailThe warning was specifically:
HEALTH_WARN 3 failed cephadm daemon(s)
[WRN] CEPHADM_FAILED_DAEMON: 3 failed cephadm daemon(s)
    daemon node-exporter.ceph001 on ceph001 is in error state
    daemon node-exporter.ceph002 on ceph002 is in error state
    daemon node-exporter.ceph003 on ceph003 is in error state
This distinction mattered. The MONs had quorum, the OSDs were up and in, and the placement groups were active+clean. The warning came from the monitoring stack’s node-exporter daemons rather than from Ceph data availability.
17. Inspecting All Orchestrated Services
cephadm shell -- ceph orch ps --format=plain
cephadm shell -- ceph orch ls
The service inventory showed:
alertmanager     1/1
crash            3/3
grafana          1/1
mgr              2/2
mon              3/5
node-exporter    0/3
osd.all-available-devices  9
prometheus       1/1
The monitoring components Prometheus, Grafana and Alertmanager were running. The failed component was node-exporter on all three nodes.
18. Troubleshooting node-exporter
I initially tried:
cephadm shell -- ceph orch daemon logs node-exporter.ceph001Ceph Pacific rejected that syntax:
Invalid command: logs not in start|stop|restart|reconfig
Error EINVAL: invalid command
I therefore moved to the host’s systemd journal. On ceph001 the relevant unit was visible as:
systemctl list-units --all | grep -i node-exporterceph-d8155edc-9fcb-11f1-b12b-525400d0e2f5@node-exporter.ceph001.service
loaded activating auto-restartThe journal exposed the real problem:
Trying to pull registry.redhat.io/openshift4/ose-prometheus-node-exporter:v4.12...

Error: unable to retrieve auth token: invalid username/password: unauthorized:
Please login to the Red Hat Registry using your Customer Portal credentials.
This explained the three warnings. cephadm was trying to deploy an OpenShift node-exporter image from the authenticated Red Hat registry, but the daemon deployment did not have usable registry authentication for that image pull.
I chose not to let this monitoring issue block the storage lab. The core Ceph services were already operational, so I continued validating Ceph storage and left node-exporter authentication as a separate troubleshooting task.
19. Creating an RBD Pool
Once the OSD layer was working, I entered the cephadm shell:
cephadm shellI created a pool named rbd with 64 PGs:
ceph osd pool create rbd 64Output:
pool 'rbd' createdI then initialized the pool for RBD:
rbd pool init rbdPool verification:
ceph osd pool lsdevice_health_metrics
rbdThe detailed pool configuration showed a replication size of three and minimum size of two:
ceph osd pool ls detailpool 2 'rbd' replicated size 3 min_size 2 crush_rule 0
pg_num 64 pgp_num 64 autoscale_mode on
application rbdIn simple terms, size 3 means Ceph aims to maintain three copies of each object. min_size 2 means the pool normally requires at least two available replicas to continue I/O in a degraded condition.
20. Creating a 5 GiB Test RBD Image
Before creating an image, the RBD pool was empty:
rbd pool stats rbd

Total Images: 0
Total Snapshots: 0
Provisioned Size: 0 B
I created a 5 GiB block image:
rbd create test-volume --size 5G --pool rbdThen listed it:
rbd ls -l rbdNAME SIZE PARENT FMT PROT LOCK
test-volume 5 GiB 2I inspected the RBD metadata:
rbd info rbd/test-volumerbd image 'test-volume':
size 5 GiB in 1280 objects
order 22 (4 MiB objects)
snapshot_count: 0
format: 2
features: layering, exclusive-lock, object-map, fast-diff, deep-flattenThe pool statistics now reflected one provisioned image:
rbd pool stats rbd

Total Images: 1
Total Snapshots: 0
Provisioned Size: 5 GiB
21. Why Creating the Same RBD Image Again Failed
I intentionally/repeatedly ran the create command again:
rbd create test-volume --size 5G --pool rbdCeph correctly rejected it:
rbd: create error: (17) File exists
librbd: rbd image test-volume already exists
This was expected. RBD image names must be unique within the same pool unless the existing image is removed or a different name is used.
22. Final Ceph Status
The storage cluster reached the following functional state:
cluster:
  id: d8155edc-9fcb-11f1-b12b-525400d0e2f5
  health: HEALTH_WARN
          3 failed cephadm daemon(s)

services:
  mon: 3 daemons, quorum ceph001,ceph002,ceph003
  mgr: ceph001.bufxpt(active), standbys: ceph002.olzcht
  osd: 9 osds: 9 up, 9 in

data:
  pools:   2 pools, 65 pgs
  usage:   approximately 90 GiB raw
  pgs:     65 active+clean
The HEALTH_WARN must not be ignored in a production environment, but in this lab its identified cause was the three failed node-exporter daemons. The storage components themselves were functioning and all PGs were active+clean.
23. What Happens When I Write Data to RBD?
Application / VM
       |
       v
RBD image (test-volume)
       |
       v
RADOS objects
       |
       v
Placement Groups (PGs)
       |
       v
CRUSH placement calculation
       |
       +----------+----------+
       |          |          |
       v          v          v
   ceph001     ceph002     ceph003
      OSD         OSD         OSD

       replicated according to pool policy
The RBD image is not stored as one giant file on one OSD. Ceph divides the logical image into RADOS objects. Objects map to placement groups, and CRUSH determines the OSD placement while respecting the cluster hierarchy and replication rules.
24. Capacity: Raw vs Usable
The lab had nine 10 GB OSD disks, so the raw capacity was approximately 90 GiB as reported by Ceph. However, the RBD pool was configured with replication size three.
Raw storage      ~ 90 GiB
Replication size = 3
Approximate theoretical data capacity before overhead
                 ~ 90 / 3
                 ~ 30 GiB
This is an important Ceph concept: raw capacity and usable replicated capacity are not the same. Replication provides resilience at the cost of additional physical storage consumption.
25. Monitoring Stack in This Lab
| Component | Purpose | Observed state |
|---|---|---|
| Prometheus | Collects and stores monitoring metrics. | Running |
| Grafana | Visualizes metrics through dashboards. | Running |
| Alertmanager | Handles alerts generated from monitoring rules. | Running |
| node-exporter | Exports host-level CPU, RAM, filesystem and OS metrics. | Failed because the required registry image could not authenticate/pull. |
The important lesson here was to separate a storage-plane problem from a monitoring-plane problem. A red monitoring daemon does not automatically mean that OSD data placement has failed. The correct response is to inspect ceph health detail, daemon state, MON quorum, OSD state and PG state before drawing conclusions.
26. Commands I Used Most Frequently
# Enter Ceph administration shell
cephadm shell

# Overall cluster state
cephadm shell -- ceph -s

# Detailed health warning
cephadm shell -- ceph health detail

# Hosts managed by cephadm
cephadm shell -- ceph orch host ls

# Available storage devices
cephadm shell -- ceph orch device ls --wide

# Daemon inventory
cephadm shell -- ceph orch ps --format=plain

# Service specifications/state
cephadm shell -- ceph orch ls

# OSD topology
cephadm shell -- ceph osd tree

# Pools
cephadm shell -- ceph osd pool ls detail

# RBD images
cephadm shell -- rbd ls -l rbd
27. Key Lessons from the Lab
- Prepare clones correctly. Hostnames, IP addresses and machine identities must be unique.
- Keep OSD disks raw. I did not format or mount vdb, vdc or vdd before handing them to Ceph.
- Validate networking and time first. Distributed storage depends on reliable node-to-node communication and synchronized systems.
- Understand cephadm’s container model. The host may not expose the
cephcommand directly;cephadm shellprovides the correct environment. - Check device availability before OSD deployment.
ceph orch device ls --wideprevented accidental use of the wrong disks. - Read health warnings precisely. My warning came from node-exporter, while all nine OSDs were up/in and all PGs were active+clean.
- Do not confuse raw and usable capacity. Replication size three substantially reduces usable capacity but provides redundancy.
- CRUSH is central to Ceph. Data placement is calculated across the topology rather than managed through a traditional central RAID controller.
28. Final Lab Topology
+-------------------------------------------------------------------+
|                         CEPH CLUSTER                              |
|                                                                   |
|  ceph001                  ceph002                  ceph003         |
|  192.168.0.60             192.168.0.61             192.168.0.62    |
|                                                                   |
|  MON --------------------- MON --------------------- MON           |
|   |                         |                         |             |
|  MGR(active)               MGR(standby)                           |
|   |                         |                         |             |
|  OSD.1                     OSD.0                     OSD.2         |
|  OSD.4                     OSD.3                     OSD.5         |
|  OSD.8                     OSD.7                     OSD.6         |
|                                                                   |
|             CRUSH distributes replicated objects                  |
|                    across host failure domains                    |
|                                                                   |
|  Pool: rbd                                                        |
|  Replication: size 3 / min_size 2                                 |
|  Test image: test-volume, 5 GiB                                   |
|                                                                   |
|  Monitoring: Prometheus + Grafana + Alertmanager                  |
|  Pending issue: node-exporter registry authentication             |
+-------------------------------------------------------------------+
29. Conclusion
Starting from a single RHEL master VM, I built a three-node Ceph lab with three dedicated OSD disks per host. cephadm established the initial cluster on ceph001, the remaining two hosts were added through the orchestrator, and all nine raw disks were converted into OSDs. The resulting cluster had three MONs in quorum, an active and standby MGR, nine OSDs up and in, and clean placement groups.
I then moved beyond infrastructure deployment and tested the storage service itself by creating an RBD pool, initializing it, creating a 5 GiB RBD image and inspecting its properties. That made the relationship between RBD, RADOS objects, placement groups, CRUSH and OSDs much easier to understand in a real environment rather than only as theory.
The remaining HEALTH_WARN was also useful from a troubleshooting perspective: it demonstrated why Ceph health must be interpreted component by component. In this case the warning was caused by node-exporter container registry authentication, while the core storage path remained operational.
My next logical lab steps are to fix node-exporter authentication, validate Grafana/Prometheus metrics, map the RBD image to a client, create snapshots and clones, test host/OSD failure and recovery, and observe how CRUSH and placement groups redistribute data during failures.
What’s Next: Real Storage Consumption & Platform Integration
In the next episode, I will move beyond building the Ceph cluster and explore how its storage is actually consumed by applications and infrastructure platforms. We will cover Ceph’s three primary storage services—RBD for block storage, CephFS for file storage, and RGW for S3-compatible object storage—followed by practical integration with Kubernetes, Red Hat OpenShift, and VMware ESXi.
The objective will be to complete the journey from Ceph infrastructure → storage services → real workloads → platform integration, demonstrating how a Ceph cluster becomes a usable enterprise storage platform.
Environment used: KVM, RHEL 9.8, Red Hat Ceph Storage 5 / Ceph Pacific 16.2.10, cephadm and Podman.
GitHub: https://github.com/ranjeetbadhe/ceph.git.