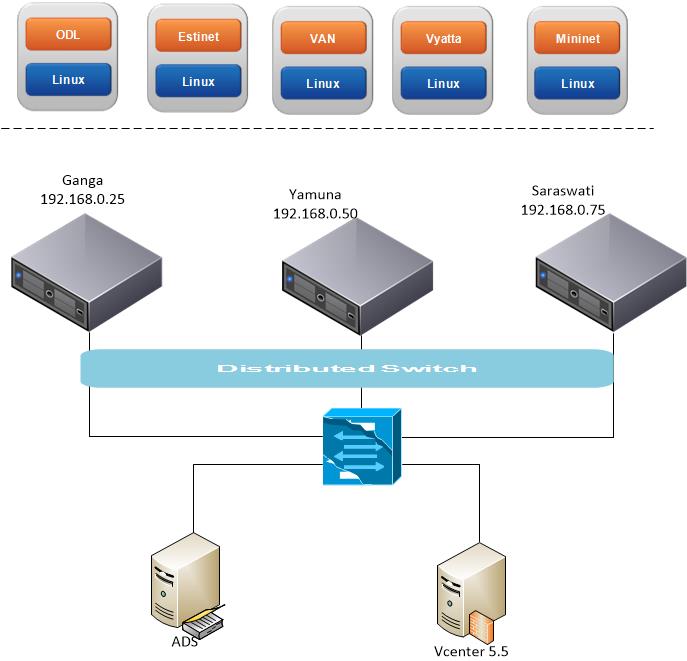
Let us install the Beryllium ODL SDN Controller . In my SDN lab setup I have 3 Dell servers , One Vcenter and a Windows Domain controller ADS.
There are 5virtual machines spinning 3 Controllers (Brocade , HP VAN and Opendaylight) and 2 Openflow simulators Mininet and Estinet. We start installing the Beryllium ODL SDN Controller on server Saraswati having IP address 192.168.0.75.

The installation has 3 steps.
- Creating Virtual machines.
- Preparing Linux Operating system.
- Installing and configuring Beryllium ODL SDN Controller .
Creating Virtual machines.
- Create a Virtual machine.

2)

3)

4) Select the drive.

5) Choose the Linux Operating System as UBUNTU 64bit

6) Chhose the NIC as standard Intel E1000 and click “Connect at Power On”

7) Choose provisioning policy as “Thick Provision Lazy Zeroed”

8) Click on Ëdit VM Setting”and go next

9) Keep the memory size to 6GB.

10) Choose the UBUNTU OS installable from Datastore for the OS Installation source. This installable file was earlier copied to Datastore.

Preparing Linux Operating system by installing OS and the required packages
11) The OS starts booting from the file sources choose the desirable options.

12)

13)

14)

15)

16)

17) Provide the hostname

18)

19)

20)

21) Create the partitions

22)

23)

24)

25)

26)

27)

28)

29)

30)

31)

32)

33)

34)

35)

36)

37)

38)

39) Assign the static IP address by editing /etc/network/interfaces.d. This IP address will be the ODL controller access IP.

40)

41) Cross verify the address change. in this case its static 192.168.0.78. Check that the VM has a direct Internet connectivity for downloading packages and Plugins.

ranjeet@odl:~$ cat /etc/network/interfaces
# This file describes the network interfaces available on your system
# and how to activate them. For more information, see interfaces(5).
source /etc/network/interfaces.d/*
# The loopback network interface
auto lo
iface lo inet loopback
# The primary network interface
auto ens32
iface ens32 inet dhcp
#iface ens32 inet dhcp
iface ens32 inet static
address 192.168.0.78
gateway 192.168.0.1
netmask 255.255.255.0
network 192.168.0.0
broadcast 192.168.0.255
42) Install the default-jre-headless using the command
sudo apt-get install default-jre-headless

43) sudo apt-get install openjdk-8-jdk

44)

45)

46) Install the MAVEN

Installing and configuring Beryllium ODL SDN Controller
47) Download the Karaff by this command.

48)

49) Verify the JAVA version
ranjeet@odl:~$ java -version
openjdk version “1.8.0_111”
OpenJDK Runtime Environment (build 1.8.0_111-8u111-b14-2ubuntu0.16.10.2-b14)
OpenJDK 64-Bit Server VM (build 25.111-b14, mixed mode)
ranjeet@odl:~$
50) Configure JAVA_HOME using the following export command.
export JAVA_HOME=/usr/lib/jvm/java-1.8.0-openjdk-amd64
51) Edit the .profile and add following entry into it
JAVA_HOME=:/usr/lib/jvm/java-1.8.0-openjdk-amd64
52)
# ~/.profile: executed by the command interpreter for login shells.
# This file is not read by bash(1), if ~/.bash_profile or ~/.bash_login
# exists.
# see /usr/share/doc/bash/examples/startup-files for examples.
# the files are located in the bash-doc package.
# the default umask is set in /etc/profile; for setting the umask
# for ssh logins, install and configure the libpam-umask package.
#umask 022
# if running bash
if [ -n “$BASH_VERSION” ]; then
# include .bashrc if it exists
if [ -f “$HOME/.bashrc” ]; then
. “$HOME/.bashrc”
fi
fi
# set PATH so it includes user’s private bin directories
PATH=”$HOME/bin:$HOME/.local/bin:$PATH”
JAVA_HOME=:/usr/lib/jvm/java-1.8.0-openjdk-amd64
53)

54) Bringupthe Controller with the command sudo ./distribution-karaf-0.4.0-Beryllium/bin/karaf

Install the featureset
55)

56)Verify that ODL is listening onport 6633.
ranjeet@odl:~$ netstat -an | grep 6633
tcp6 0 0 :::6633 :::* LISTEN
ranjeet@odl:~$
Access the controller usig the URL http://serverip:8181/index.html#/login, in this case http://192.168.0.78:8181/index.html#/login

57) Enter the default credentials as Admin/admin

58)
